Xây dựng API frontend quản lý Car bằng server nodejs
5 chương · 20 bài
Mục lục
- Tổng quan
- Cấu hình chạy server node js
- cài đặt Redis-server trên Windows
- Cài đặt mongorestore trên window
- Cấu hình file swagger.json
- Xây dựng các route api 2 bài
- Xây dựng các bảng car và carcategory 2 bài
- Xây dựng các models 3 bài
- Thêm table cars vào db
- Xây dựng các controller 1 bài
- Xây dựng controller cho cars.json.js
- Tạo view view.json.js cho carcategories
- Xây dựng các view json 2 bài
- Kiểm tra version của app và kiểm tra version của app server node
- Hoàn thành
Tổng quan
Trong phần dựng api này chúng ta sẽ làm đầy đủ chức năng, thêm sửa, xóa cho api car
Các api sau:
1.Xây dưng api thêm thêm, sửa, xóa danh mục car
Đối với danh mục car chúng ta có các trường sau: _id, name, image, note
2.Xây dựng api thêm sửa xóa car
Đối với car chúng ta có các thuộc tính sau: _id, name, year, image, category_id, note
Hệ thống api được chia thành 2 phần 1
apps api dành cho admin
được đặt trong thư mục admin/apps
apps api danh dành cho frontend được đặt trong thư mục apps
Đối với các app dành cho frontend phục vụ cho webfronted, app dành cho android, app dành cho ios
Cấu hình chạy server node js
Đầu tiên bạn cần phải pull code về phía máy tính của bạn
sau đó bật công cụ webstorm lên và mở thư mục code đó
ứng dụng nodejs này sử dụng mongodb. do vậy bạn cần phải cài mongodb nhấn vào đây để xem hướng dẫn
Tiếp theo bạn cần công cụ để quản lý mongodb nhấn vào đây để tải về
Sau khi cài xong mongodb bạn cần import db vào đây là db mẫu các bạn tải tại đây để import bạn xem hướng dẫn ở đây
Sau khi cài đặt mongodb thành công bạn chạy lệnh sau
Bạn tạo một db có tên là expresscart
Sau đó bạn cần import db mẫu vào
Bạn cần cài đặt tool để import, trước khi thực hiện inport nhé bạn nhấn vào đây để xem cách cài đặt tool này trên window nhé
Bạn chạy lệnh sau
mongorestore -d expresscart /Users/mac/Downloads/expresscart
Trong đó phần màu đỏ là đường dẫn tới thư mục chứa db mà bạn vừa tải về
Chú ý: có nhiều phiên bản mongo do đó cũng có những cách import khác nhau, do vậy nếu bạn không import được thì lên google tìm kiếm nhé
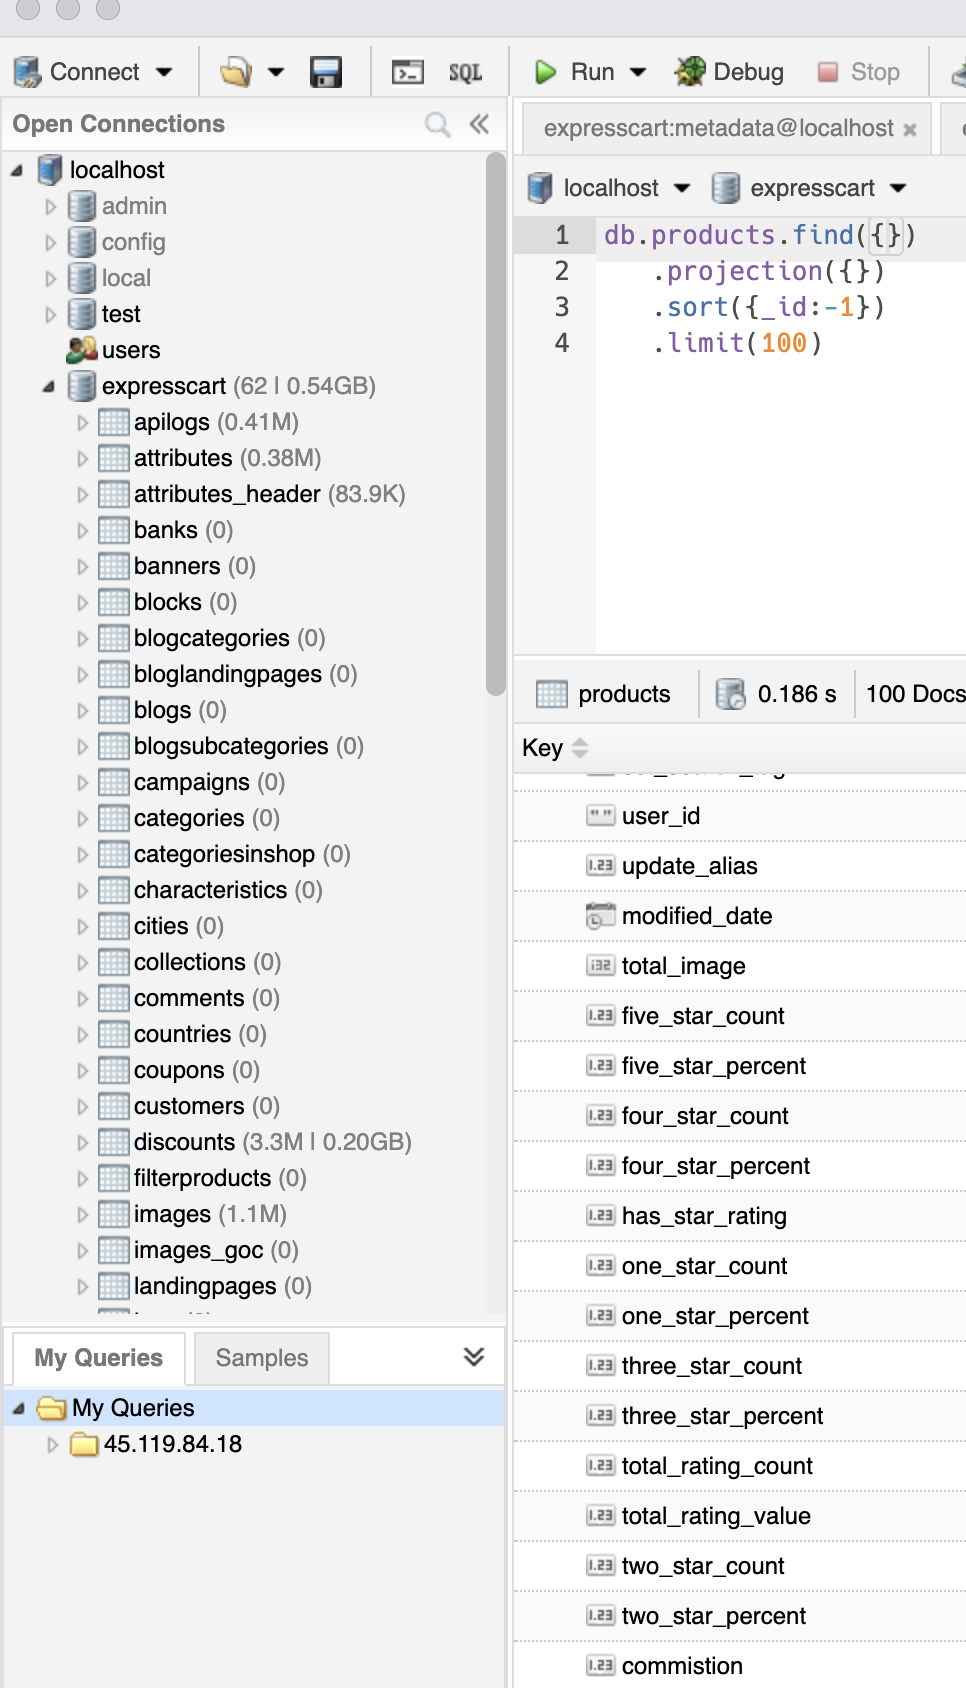
Sau khi bạn import thành công thì bạn sẽ nhìn thấy các bảng như hình dưới đây
Bước tiếp theo chúng ta cần tải source code api_adayroi về. các bạn nhấn vào đây để tải bộ source node về
Chú ý bộ source này đã code module node rồi, nên không cần phải chạy npm install
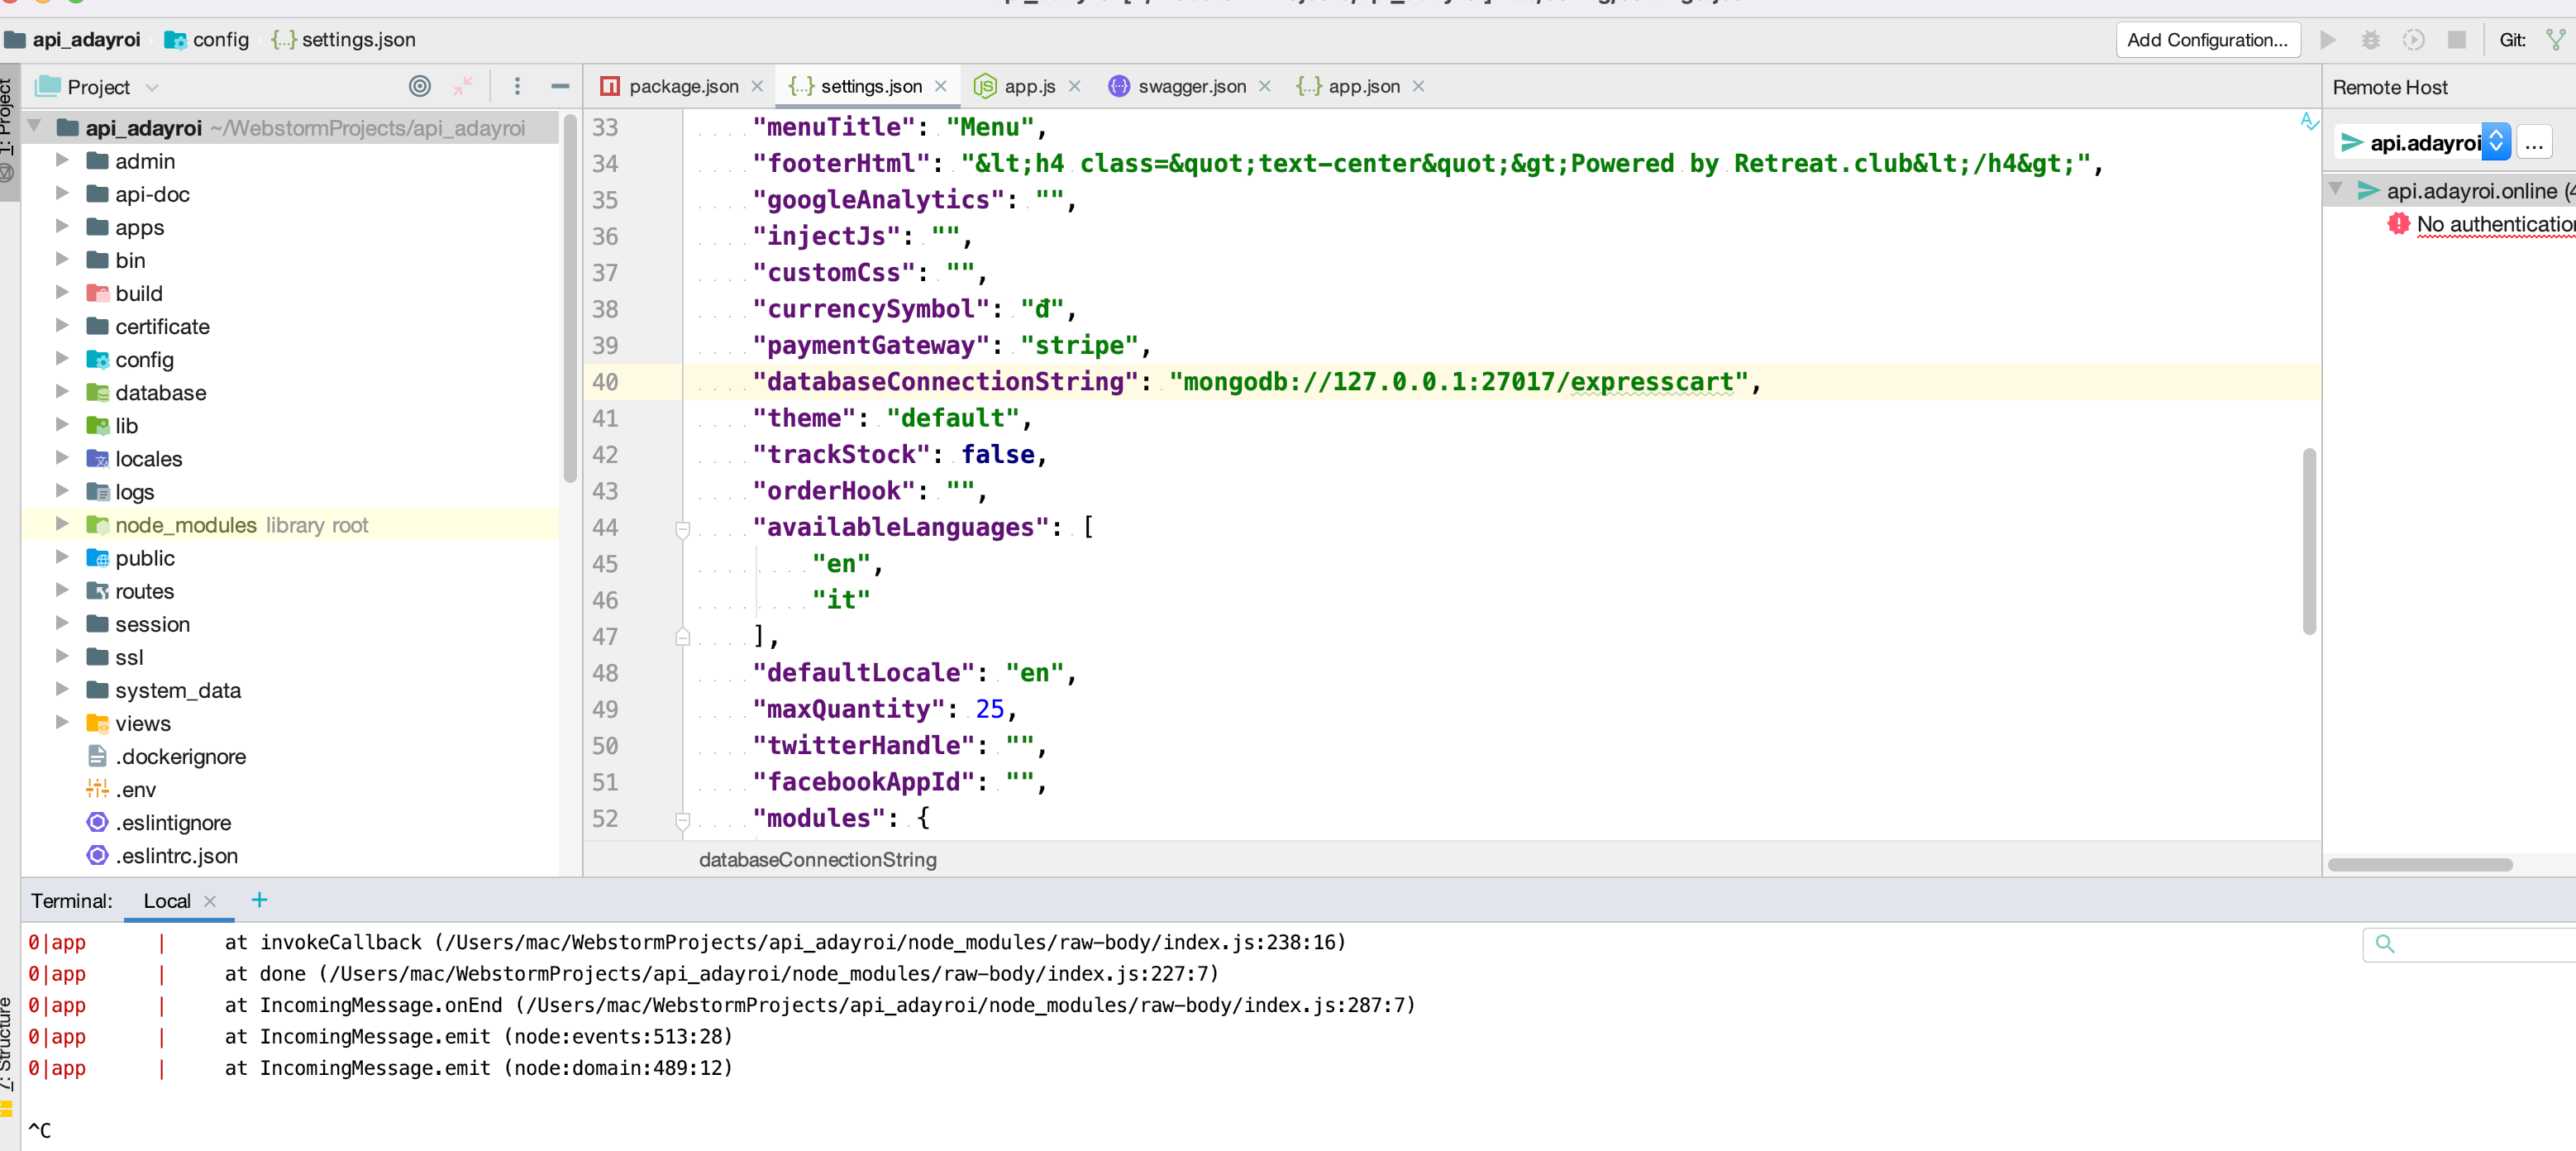
Sau khi giải nén xong các bạn bật webstorm lên và mở thư mục này ra
chúng ta sẽ có như hình sau
Sau đó các bạn mở terminal trên websotrm để chạy lệnh sau
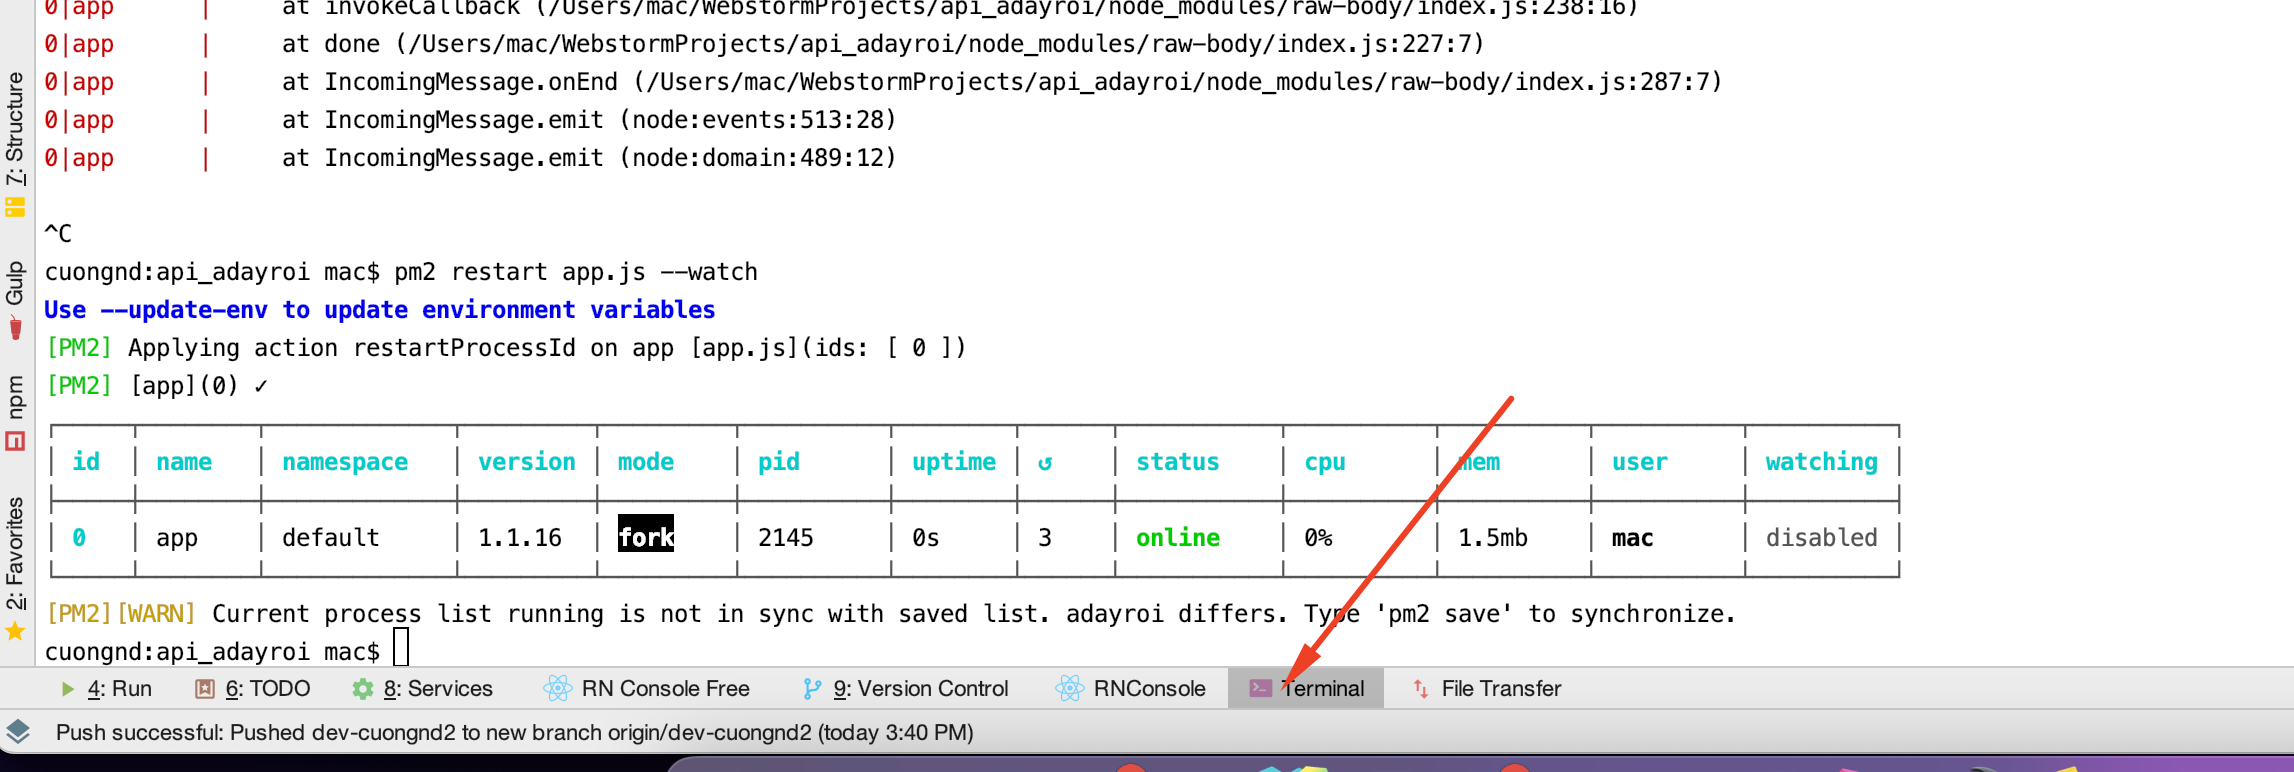
pm2 start app.js --watch
Chú ý nếu chưa có pm2
bạn cần chạy lệnh sau để cài npm install pm2
sau đó gõ lại lệnh như trên là được
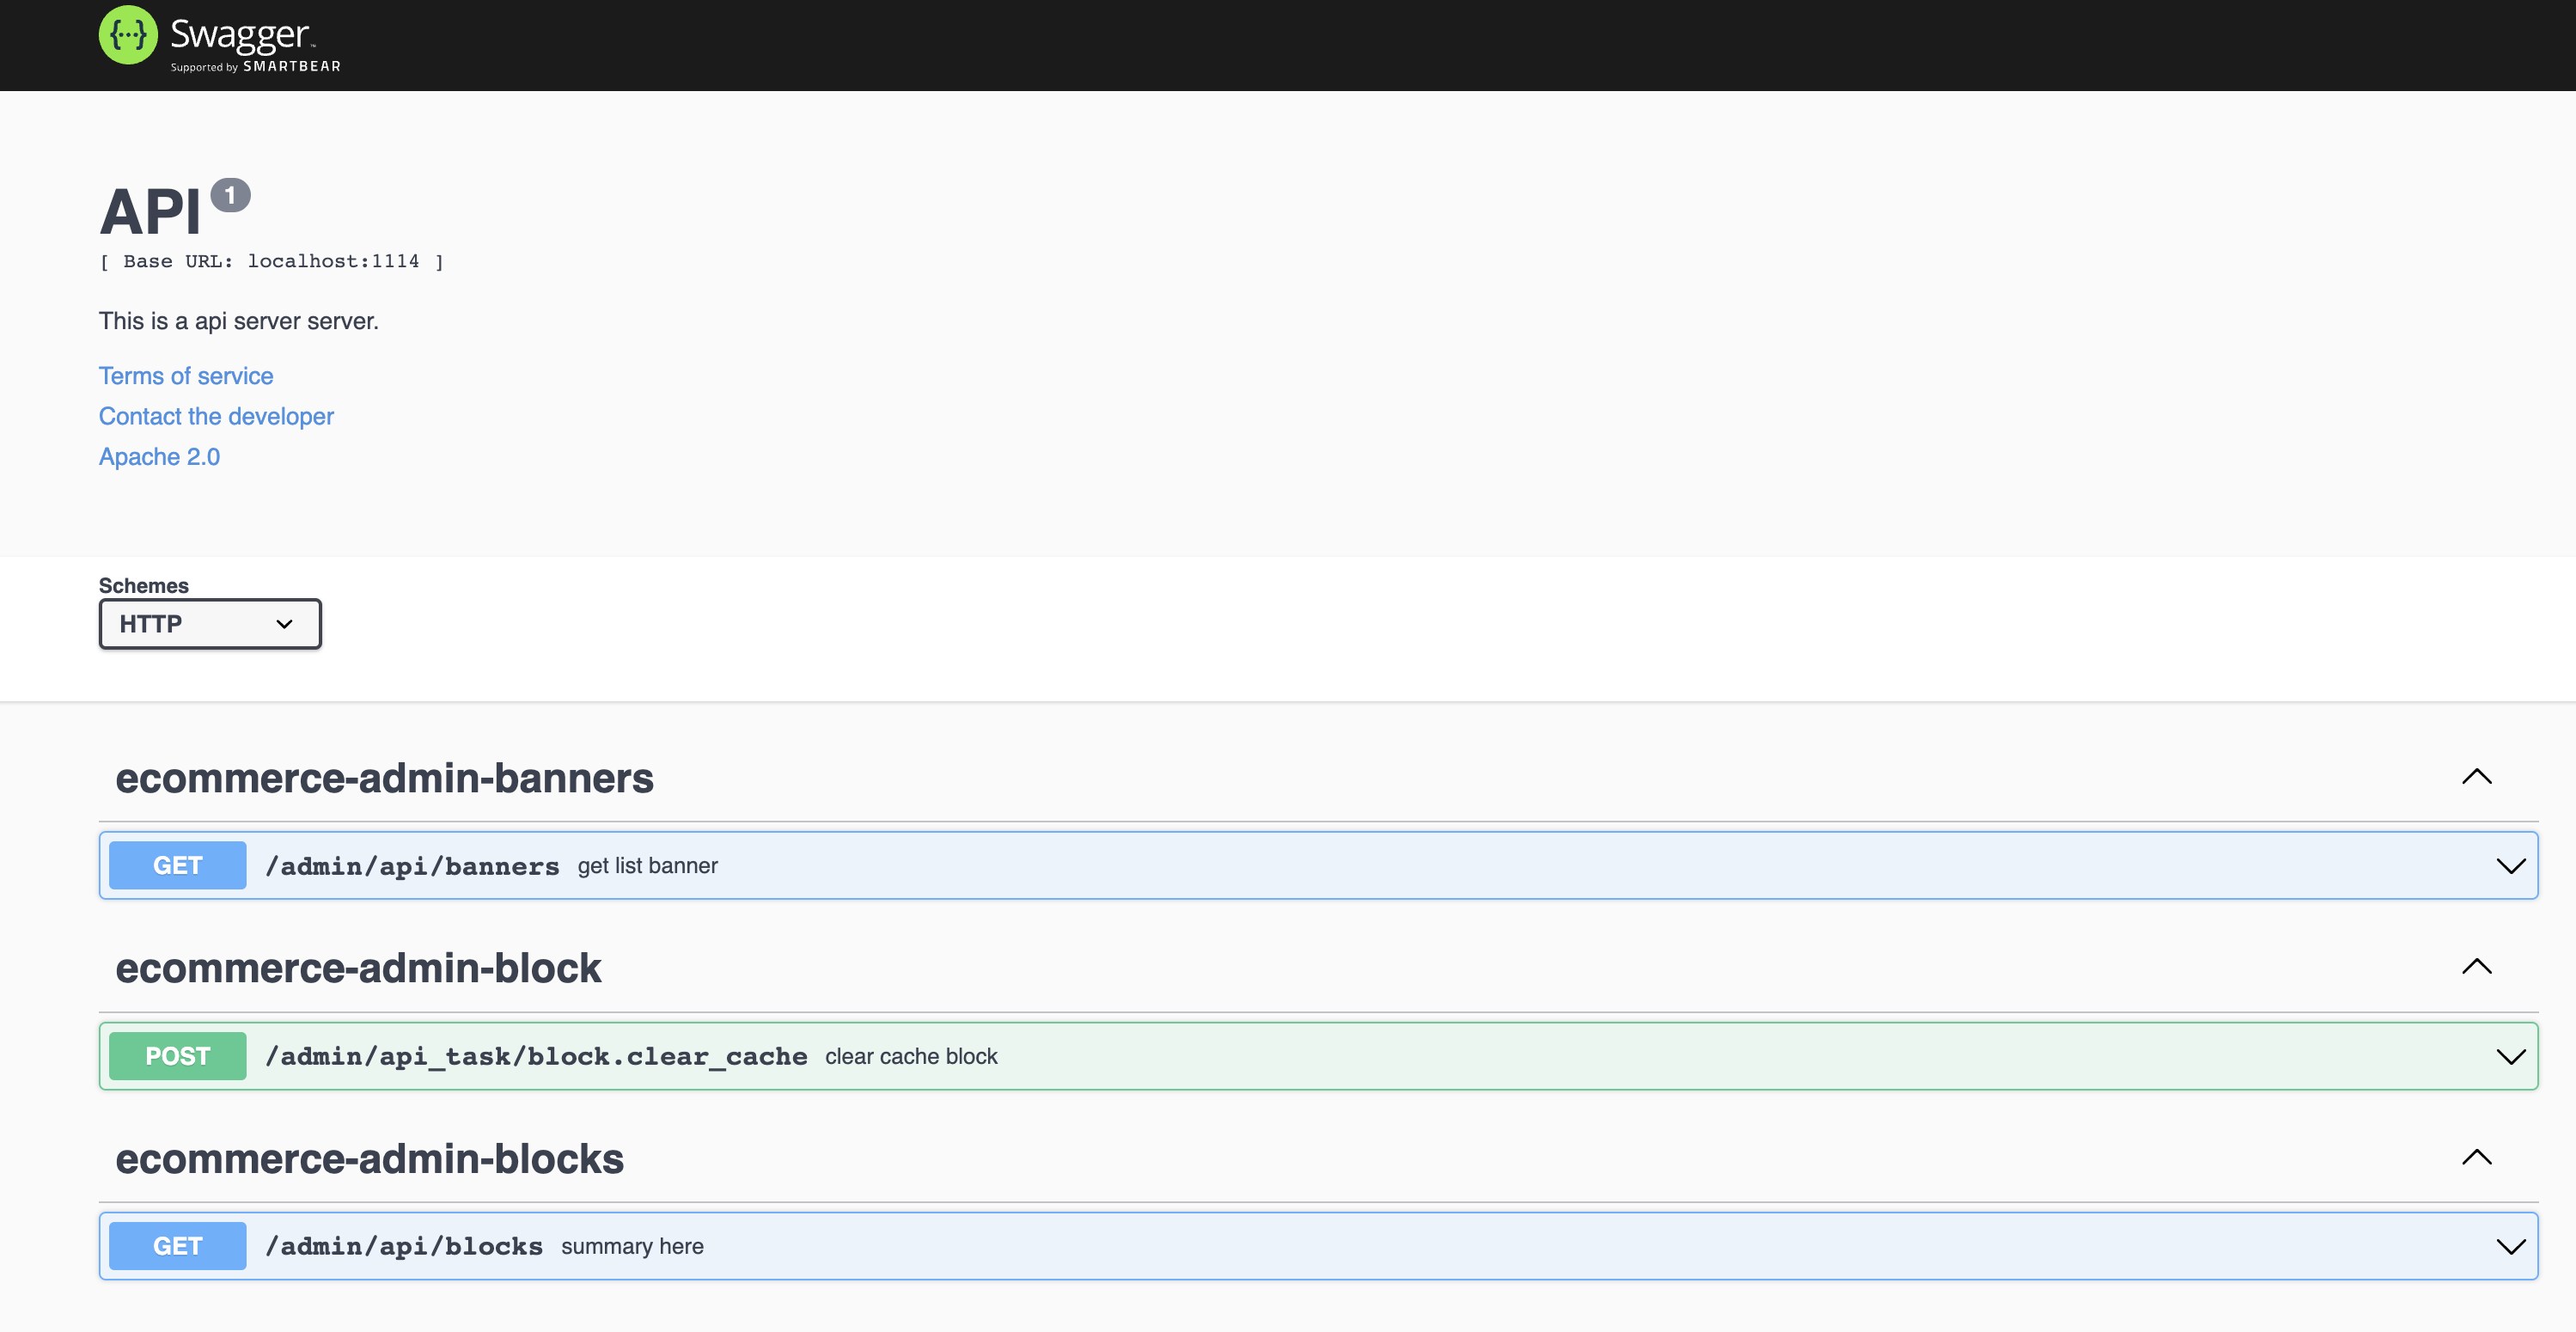
Sau đó các bạn ở trình duyệt lên và gõ địa chỉ http://localhost:1114/doc
Nếu bạn nhìn thấy như sau thì ok
Như vậy là các bạn đã cài xong một con server api_adayroi của node js. việc tiếp theo là các bạn cần phải viết api để app có thể gọi đến nó và hiển thị dữ liệu lên
Nếu trong quá trình cập nhật code của nodejs chúng ta cần phải sử dụng lệnh sau để reset lại app pm2 restart app --watch
Ngoài lệnh sau để xem log từ phía server : pm2 log app
cài đặt Redis-server trên Windows
Cài đặt Redis Server trên Windows
Hiện tại Redis Server vẫn chưa có bản Offical dành cho windows. (Không nên chạy Redis-Server trên Windows vì có thể nó sẽ có một số lỗi, chưa tối ưu và không được update)
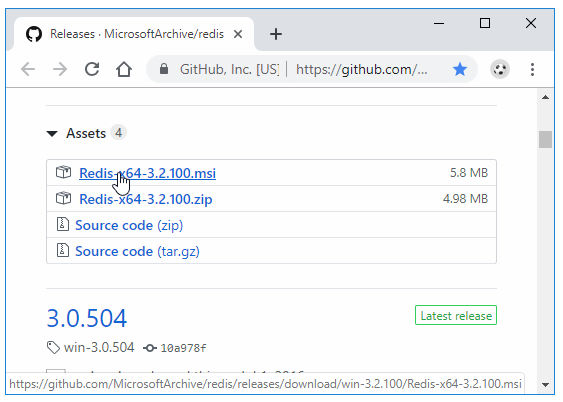
Tuy nhiên bạn vẫn có thể download các phiên bản cũ tại https://github.com/MicrosoftArchive/redis/releases để chạy thử và test trên windows.
Bạn có thể download file cài đặt .msi hoặc file .zip (giải nén về chạy file redis-server.exe là được)
Ở đây mình tải file .msi để cài đặt. Trong quá trình cài đặt nó sẽ cho phép chúng ta tùy chỉnh một số tham số theo ý muốn.
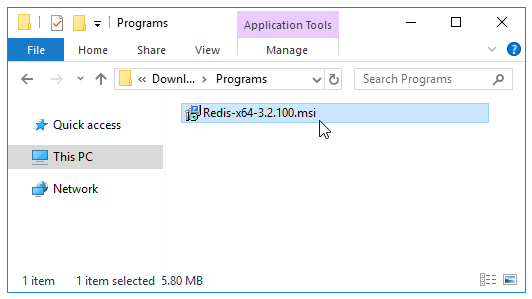
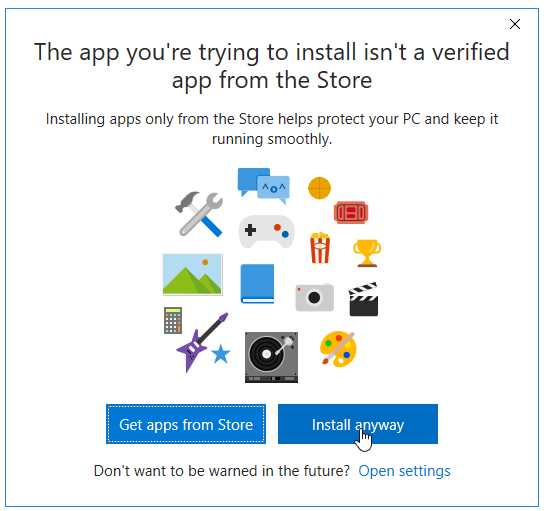
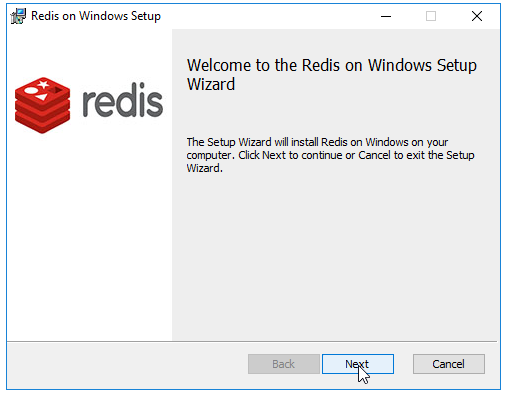
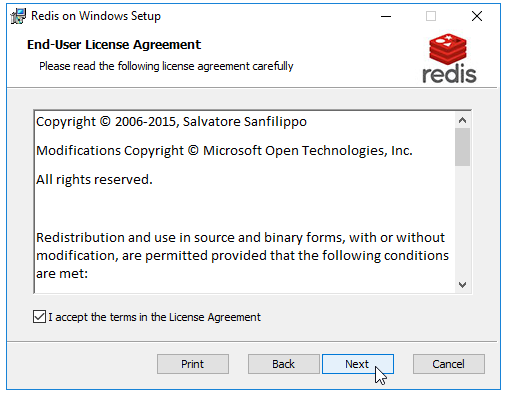
Trong phần Install Redis on Windows to các bạn chọn thư mục muốn cài đặt
Nhớ chọn ô Add the Redis … nó sẽ tự động thêm thư mục cài đặt vào biến môi trường, sau đó bạn có thể chạy lệnh redis-server, redis-cli ở bất kỳ thư mục nào trong màn hình cmd/powershell
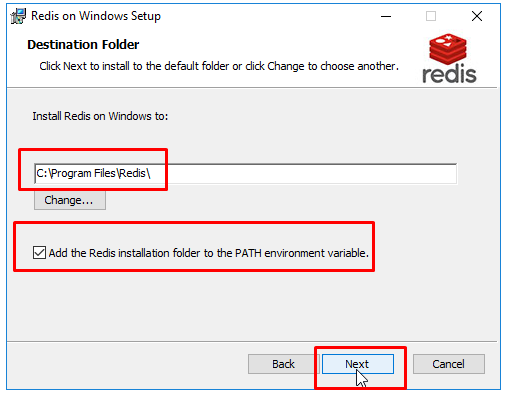
Chọn Port cho Redis Server (mặc định là 6379)
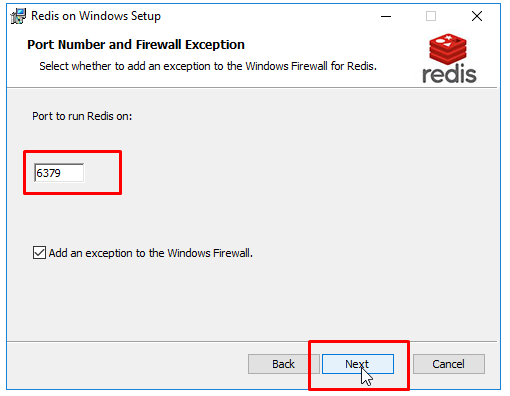
Bạn cũng có thể giới hạn dung lượng tối đa dành cho Redis Server (ở đây mình không đặt giới hạn)
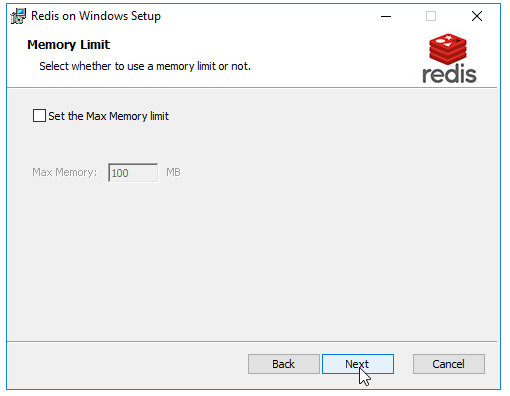
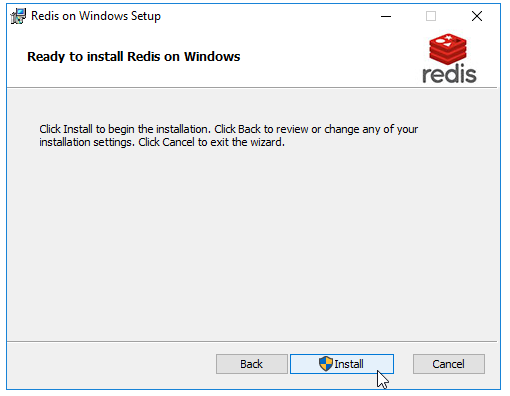
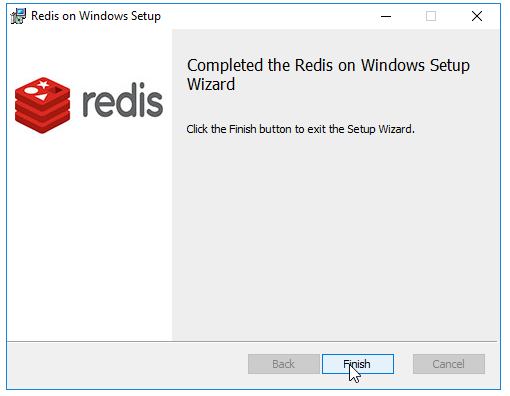
Sau khi cài đặt xong, mở màn hình cmd hoặc powershell và chạy lệnh redis-server
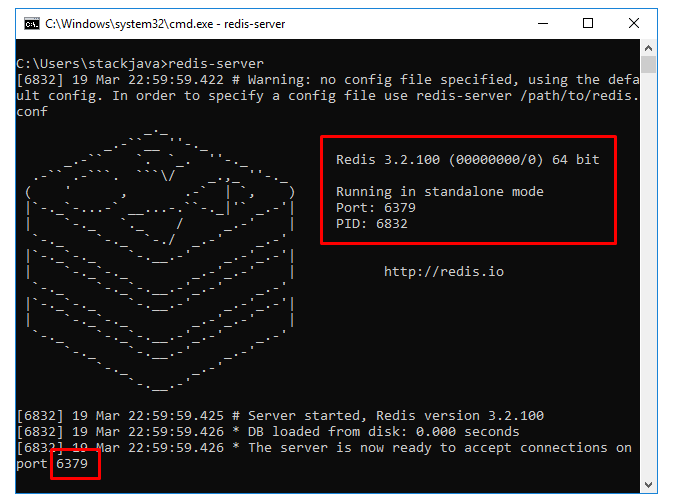
Để sử dụng file redis.conf cấu hình cho redis-server bạn có thể chạy lệnh redis-server với đường dẫn tới file redis.conf
Ví dụ redis-server C:/redis.conf
Chạy lệnh redis-cli để connect tới redis server và thực hiện thêm, lấy dữ liệu
set name kai: lưu chuỗi text kai vào biến name
get name: lấy giá trị trong biến name
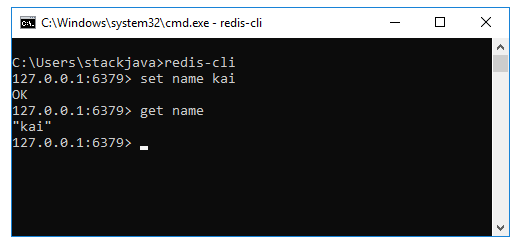
Okay, Done!
Cài đặt mongorestore trên window
Đây là công cụ để import db expresscart vào mongodb
Đầu tiên các bạn vào đường linh sau nhấn vào đây để vào đường link này
Tại đây các bạn tìm đến dòng có nội dung sau "
MongoDB Command Line Database Tools Download
"
hoặc các bạn có thể nhìn như hình
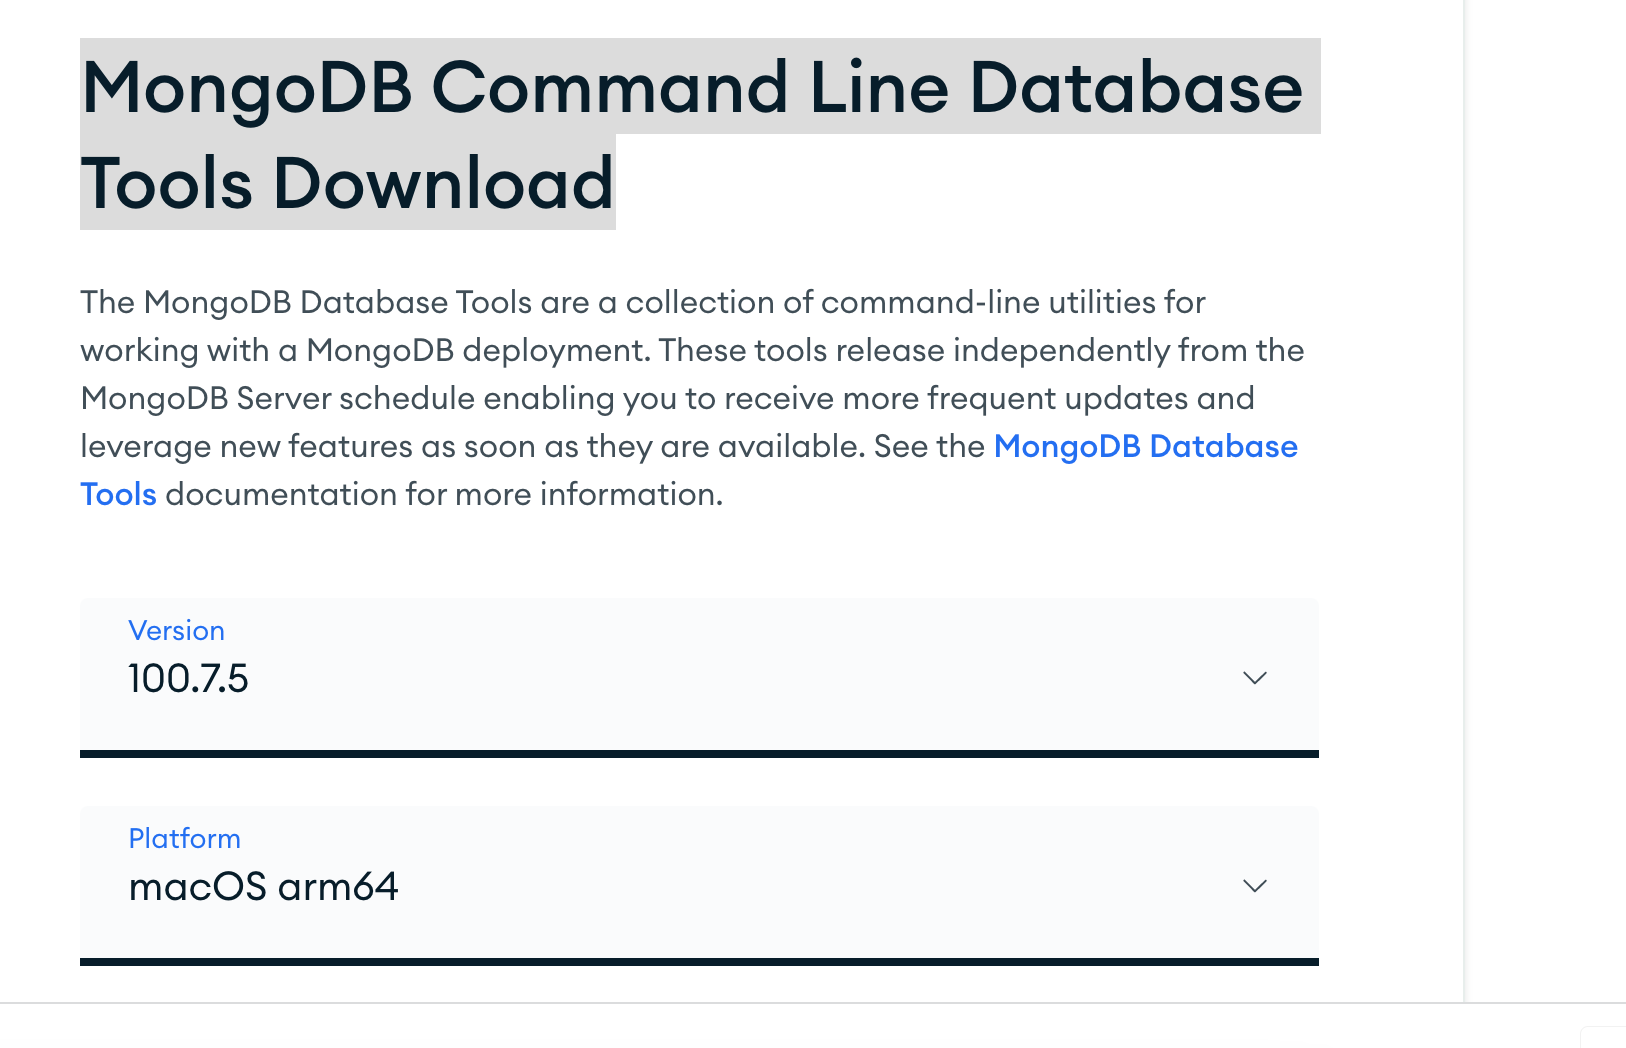
Sau đó các bạn tìm đúng phiên bản window của các bạn. tiếp theo các bạn tải về, sau đó giải nén ra
tiếp theo bạn copy thư mục giải nén của mình vào một thư mục nào đó để lưu lại, tránh tình trạng xóa mất
Ví dụ tôi lưu ở thư mục d:/study/mongotool
Bây giờ các bạn mở thư mục này ra, bạn sẽ nhìn thấy thư mục bin
d:/study/mongotool/bin bạn nhớ đường dẫn này. tiếp theo bạn chạy
Thêm thư mục vào biến PATH
Để bắt đầu, nhấp chuột phải vào biểu tượng Máy tínhhoặc PC nàytrên màn hình và chọn Thuộc tính. Nếu bạn chưa có biểu tượng đó trên màn hình, bạn có thể thêm bất kỳ biểu tượng máy tính để bàn nào bị thiếu dễ dàng.

Trên Hệ thốngmạnh mẽ, bạn sẽ thấy liên kết Cài đặt hệ thống nâng caoở phía bên trái.

Thao tác này sẽ hiển thị hộp thoại Thuộc tính Hệ thống, hộp thoại này đã được mở cho tab Nâng cao. Tiếp tục và nhấp vào nút Biến môi trườngở dưới cùng.

Trên Biến môi trườnghộp thoại, bạn sẽ thấy hai bộ biến: một cho biến người dùng và biến khác cho biến hệ thống. Cả hai danh sách đều có biến PATH, vì vậy bạn phải quyết định biến nào cần chỉnh sửa.

Nếu bạn chỉ cần các lệnh cho tài khoản người dùng của riêng bạn, sau đó chỉnh sửa biến người dùng. Nếu bạn cần nó để làm việc trên hệ thống máy tính bất kể người dùng đã đăng nhập thì hãy chỉnh sửa biến hệ thống. Nhấp vào Đường dẫnvà sau đó nhấp vào Chỉnh sửa.

Bây giờ ban bổ xung d:/study/mongotool/bin vào PATH là xong, giờ bạn sẽ quay lại để import db vào nhé
Cấu hình file swagger.json
Mởi flie : api-doc/swagger.json
Bổ xung địa chỉ ip localhost trên máy tính của các bạn vào đây
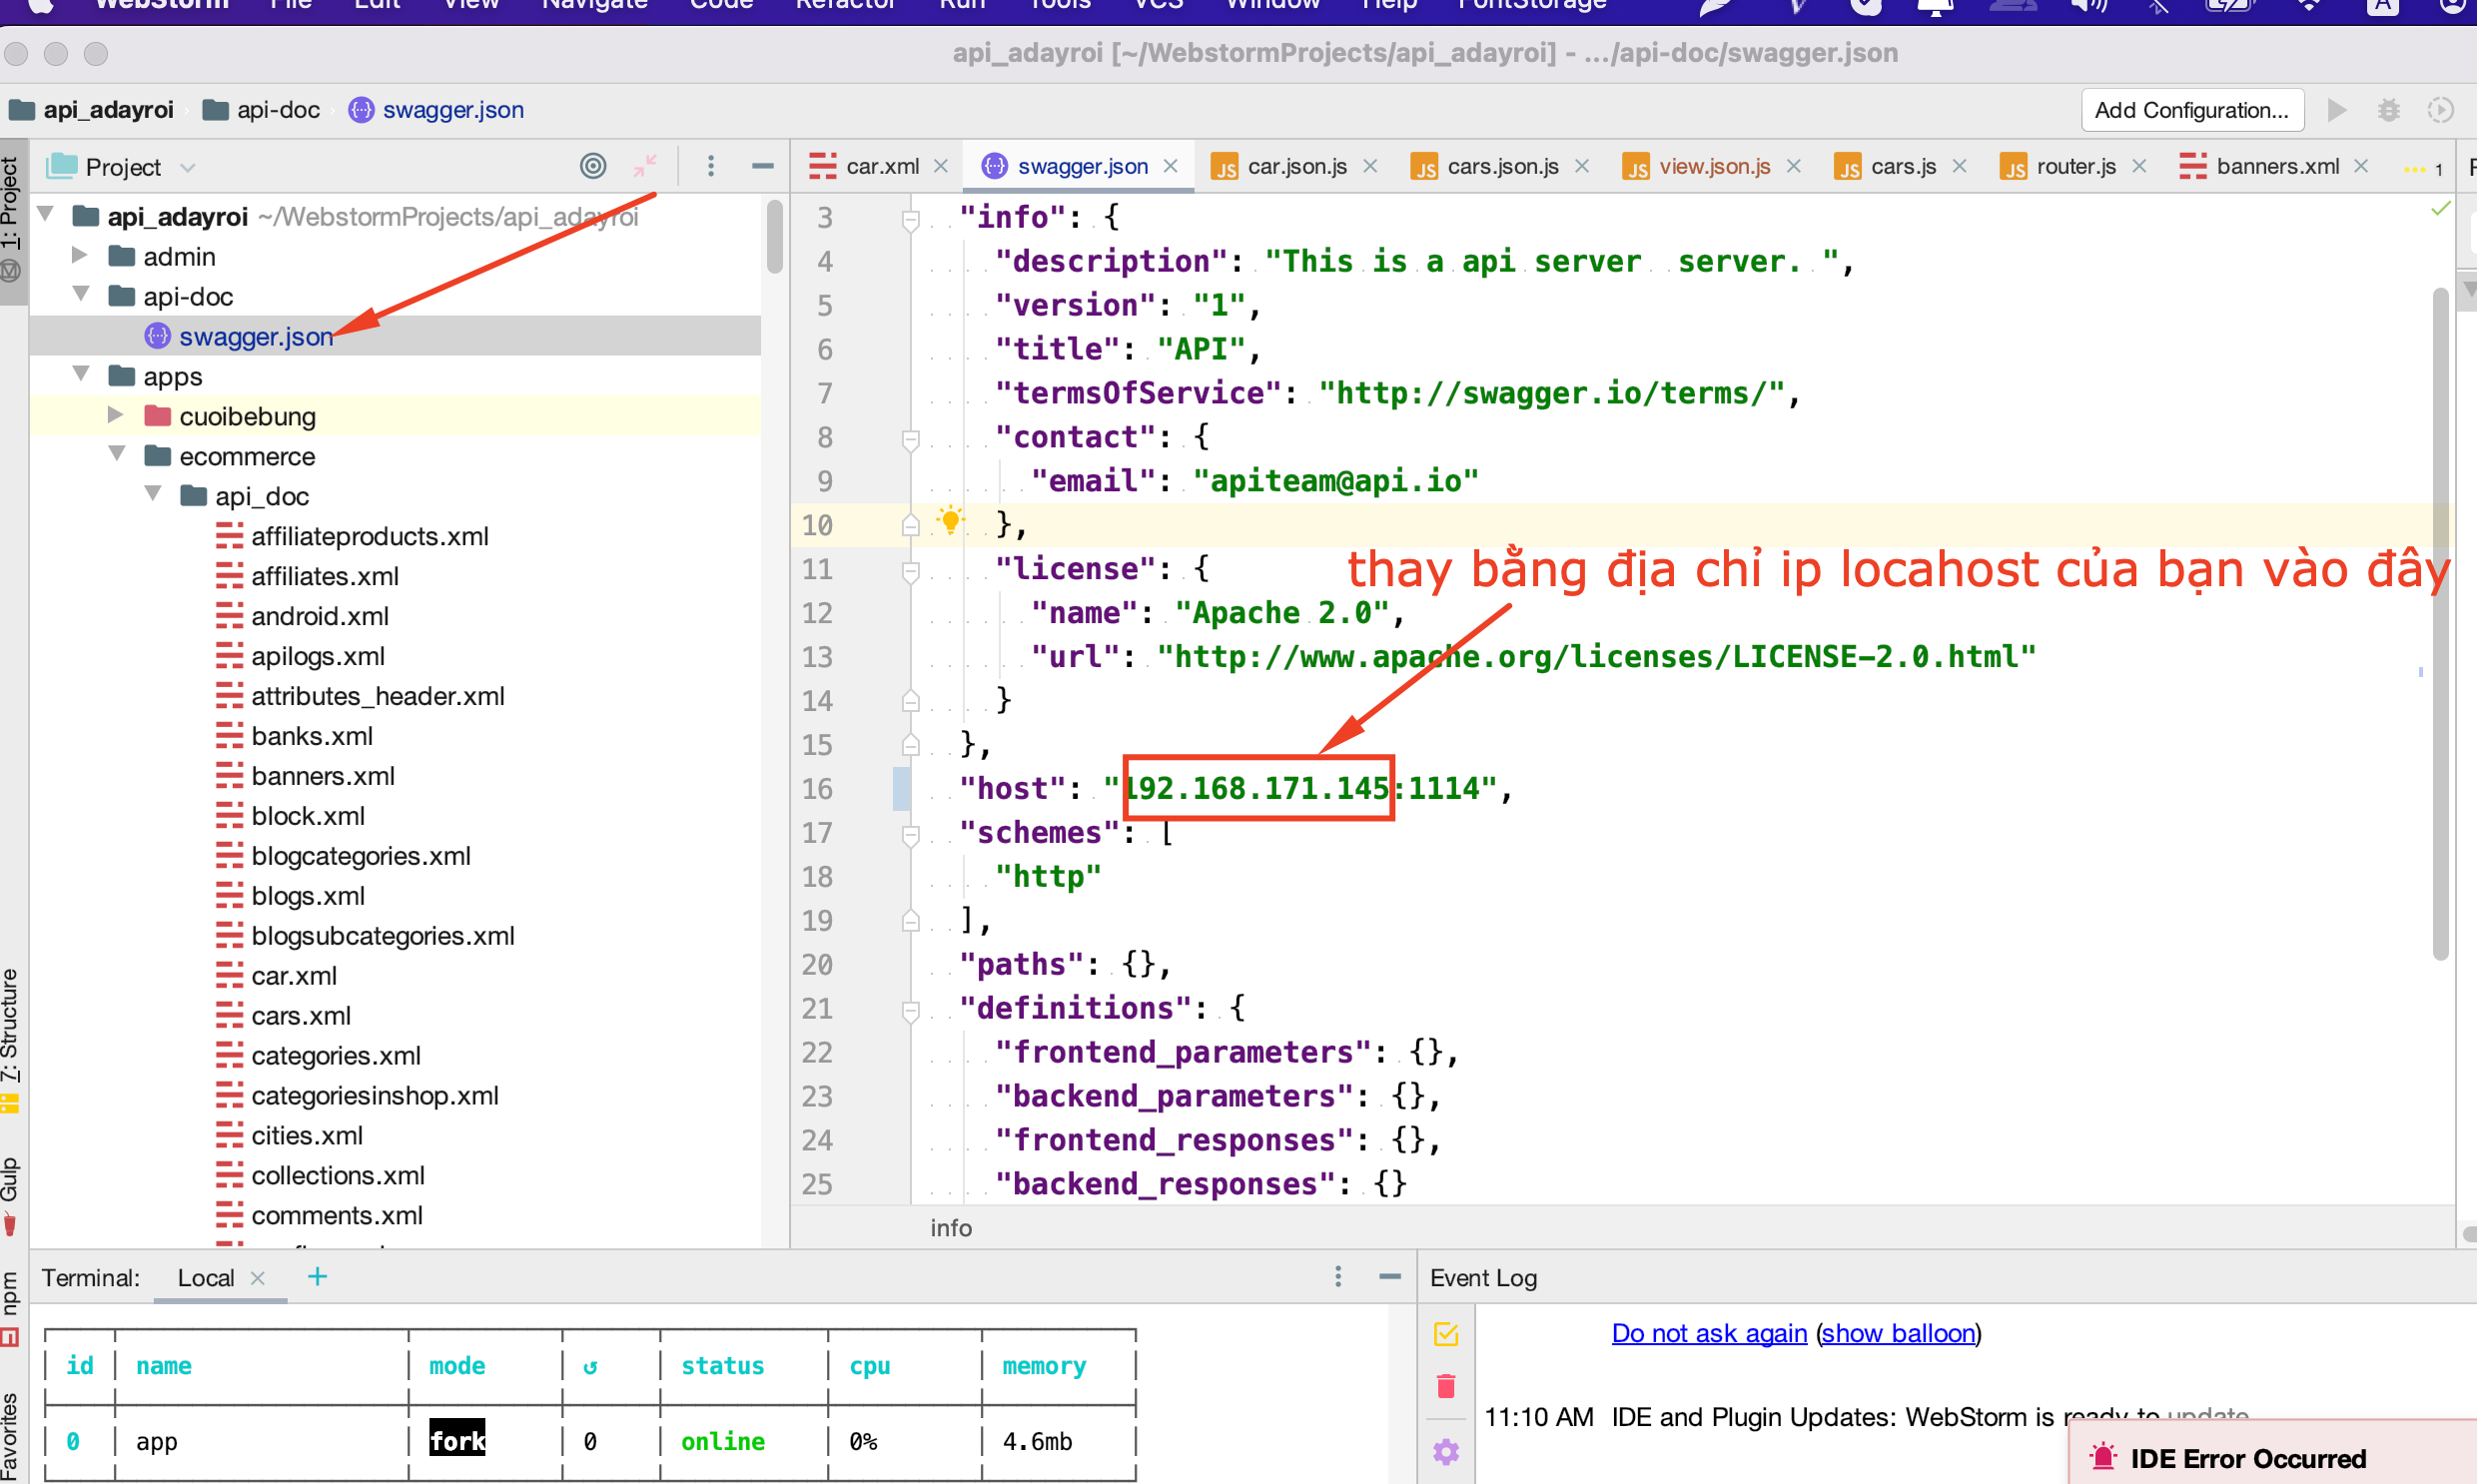
Sau đó các bạn mở trình duyệt gõ địa chỉ sau http://192.168.171.145:1114/doc (Nhớ thay bằng địa chỉ ip của bạn nhé)
Tạo file cars.xml
Tên file: cars.xml
Nơi lưu file: apps/ecommerce/api_doc
Nội dung file:
<?xml version="1.0" encoding="utf-8"?>
<list_api>
    <scope type="get" route="/limit/{limit}/start/{start}"  authorization="false">
        <content summary="get list car" description="get list car" type="list">
            <parameters name="Content-Type" type="string" required="true" in="header" example="application/json" />
            <parameters name="Authorization" type="string" required="true" in="header" example="Bearer 123" />
            <parameters name="api_key" type="string"  in="path" example="20" />
            <parameters name="limit" type="number"  in="path" example="20" />
            <parameters name="start" type="number"  in="path" example="0" />
        </content>
    </scope>

    <scope type="get" route="/{id}"  authorization="false">
        <content summary="get  car by id" description="get  car id" type="item">
            <parameters name="Content-Type" type="string" required="true" in="header" example="application/json" />
            <parameters name="Authorization" type="string" required="true" in="header" example="Bearer 123" />
            <parameters name="id" type="string"  description="id"   in="path" example=""   />
        </content>
    </scope>
</list_api>
Tạo file carcategories.xml
Tại thư mục : admin/apps/ecommerce/api_doc
Tạo file carcategories.xml
Nội dung file
<?xml version="1.0" encoding="utf-8"?>
<list_api>
    <scope type="get" path="/list" authorization="false">
        <content summary="summary here" description="Des description">
            <parameters>
                <parameter name="category_id" type="string" in="path" description="category" />
                <parameter name="sub_category_id" type="string" in="path" description="sub category id" />
            </parameters>
            <responses code="200" description="ok">

            </responses>
            <responses code="404" description="not found">

            </responses>
        </content>
    </scope>
    <scope type="get" path="/form">
        <content summary="summary here" description="Des description" type="item">
            <responses code="200" description="ok">

            </responses>
            <responses code="404" description="not found">

            </responses>
        </content>
    </scope>
    <scope type="get" route="/{id}" authorization="false">
        <content summary="get order by id" description="get order by id" type="item">
            <parameters name="id" type="string"  in="path" />

            <responses code="200" description="ok">
            </responses>
            <responses code="404" description="not found">

            </responses>
        </content>
    </scope>

</list_api>
Tạo table cars.js
Tên file: cars.js
Nơi lưu file: admin/apps/ecommerce/tables
Nội dung file:
var table = require(`${path_root}/lib/mvc/tables/Table`);
class cars  extends table{
    constructor(req, res,next){
        super(req, res,next);
        this._id="";
        this.car_name="";
        this.car_color="";
        this.car_model="";
        this.car_description="";
        this.added_date="";
        this.state=1;
        //Nếu có thêm các trường thì bổ xung ở đây
        //hiện mới có rất ít các trường của item, do đó tùy từng thuộc tính và kiểu dữ liệu mà các bạn bổ xung vào đây nhé
        // chú ý : các trường nên trùng với các trường của item trong viewobject của app android nhé

    }
}
module.exports =cars;Tạo bảng carcategories.js
Tại thư mục admin/apps/ecommerce/tables
Tạo file carcategories.js
Nội dung file
var table = require(`${path_root}/lib/mvc/tables/Table`);

class carcategories extends table {
    constructor(req, res,next) {
        super();
        this._id = "";
        this.name = "";
        this.image= "";
        this.note= "";
        this.published=1;
        this.created_date = new Date();
        this.modify_date = new Date();
    }
}

module.exports = carcategories;
Xây dựng file model car.js
Tên file: car.js
Nơi lưu file: apps/ecommerce/models
Nội dung file:
var modelfrontenditem = require(`${path_root}/lib/mvc/models/modelfrontenditem`);
const express = require('express');
var model = require(`${path_root}/lib/mvc/models/model`);
class Car extends modelfrontenditem {

    tableName() {
        return "cars";
    }
    async getCar(req, res, next,id) {
        const car= await super.getCar(req, res, next,id);

        return car;
    }


}
module.exports = Car;
Xây dựng Model cars.js
Tên file: cars.js
Nơi lưu file: apps/ecommerce/models
Nội dung file:
var modelfrontendlist = require(`${path_root}/lib/mvc/models/modelfrontendlist`);
class Cars extends modelfrontendlist {
    constructor() {
        super();
    }
    tableName() {
        return "cars";
    }
    async getList(req, res, next){
        let listCar= await super.getList(req, res, next);

        return listCar;
    }

}

module.exports = Cars;Tạo model carcategory.js
Tại thư mục apps/ecommerce/models
tạo file carcategory.js
Nội dung file
var modelfrontenditem = require(`${path_root}/lib/mvc/models/modelfrontenditem`);
const model = require(`${path_root}/lib/mvc/models/model`);
const express = require('express');
class carcategory extends modelfrontenditem {

    tableName() {
        return "carcategories";
    }

}
module.exports = carcategory;
Thêm table cars vào db
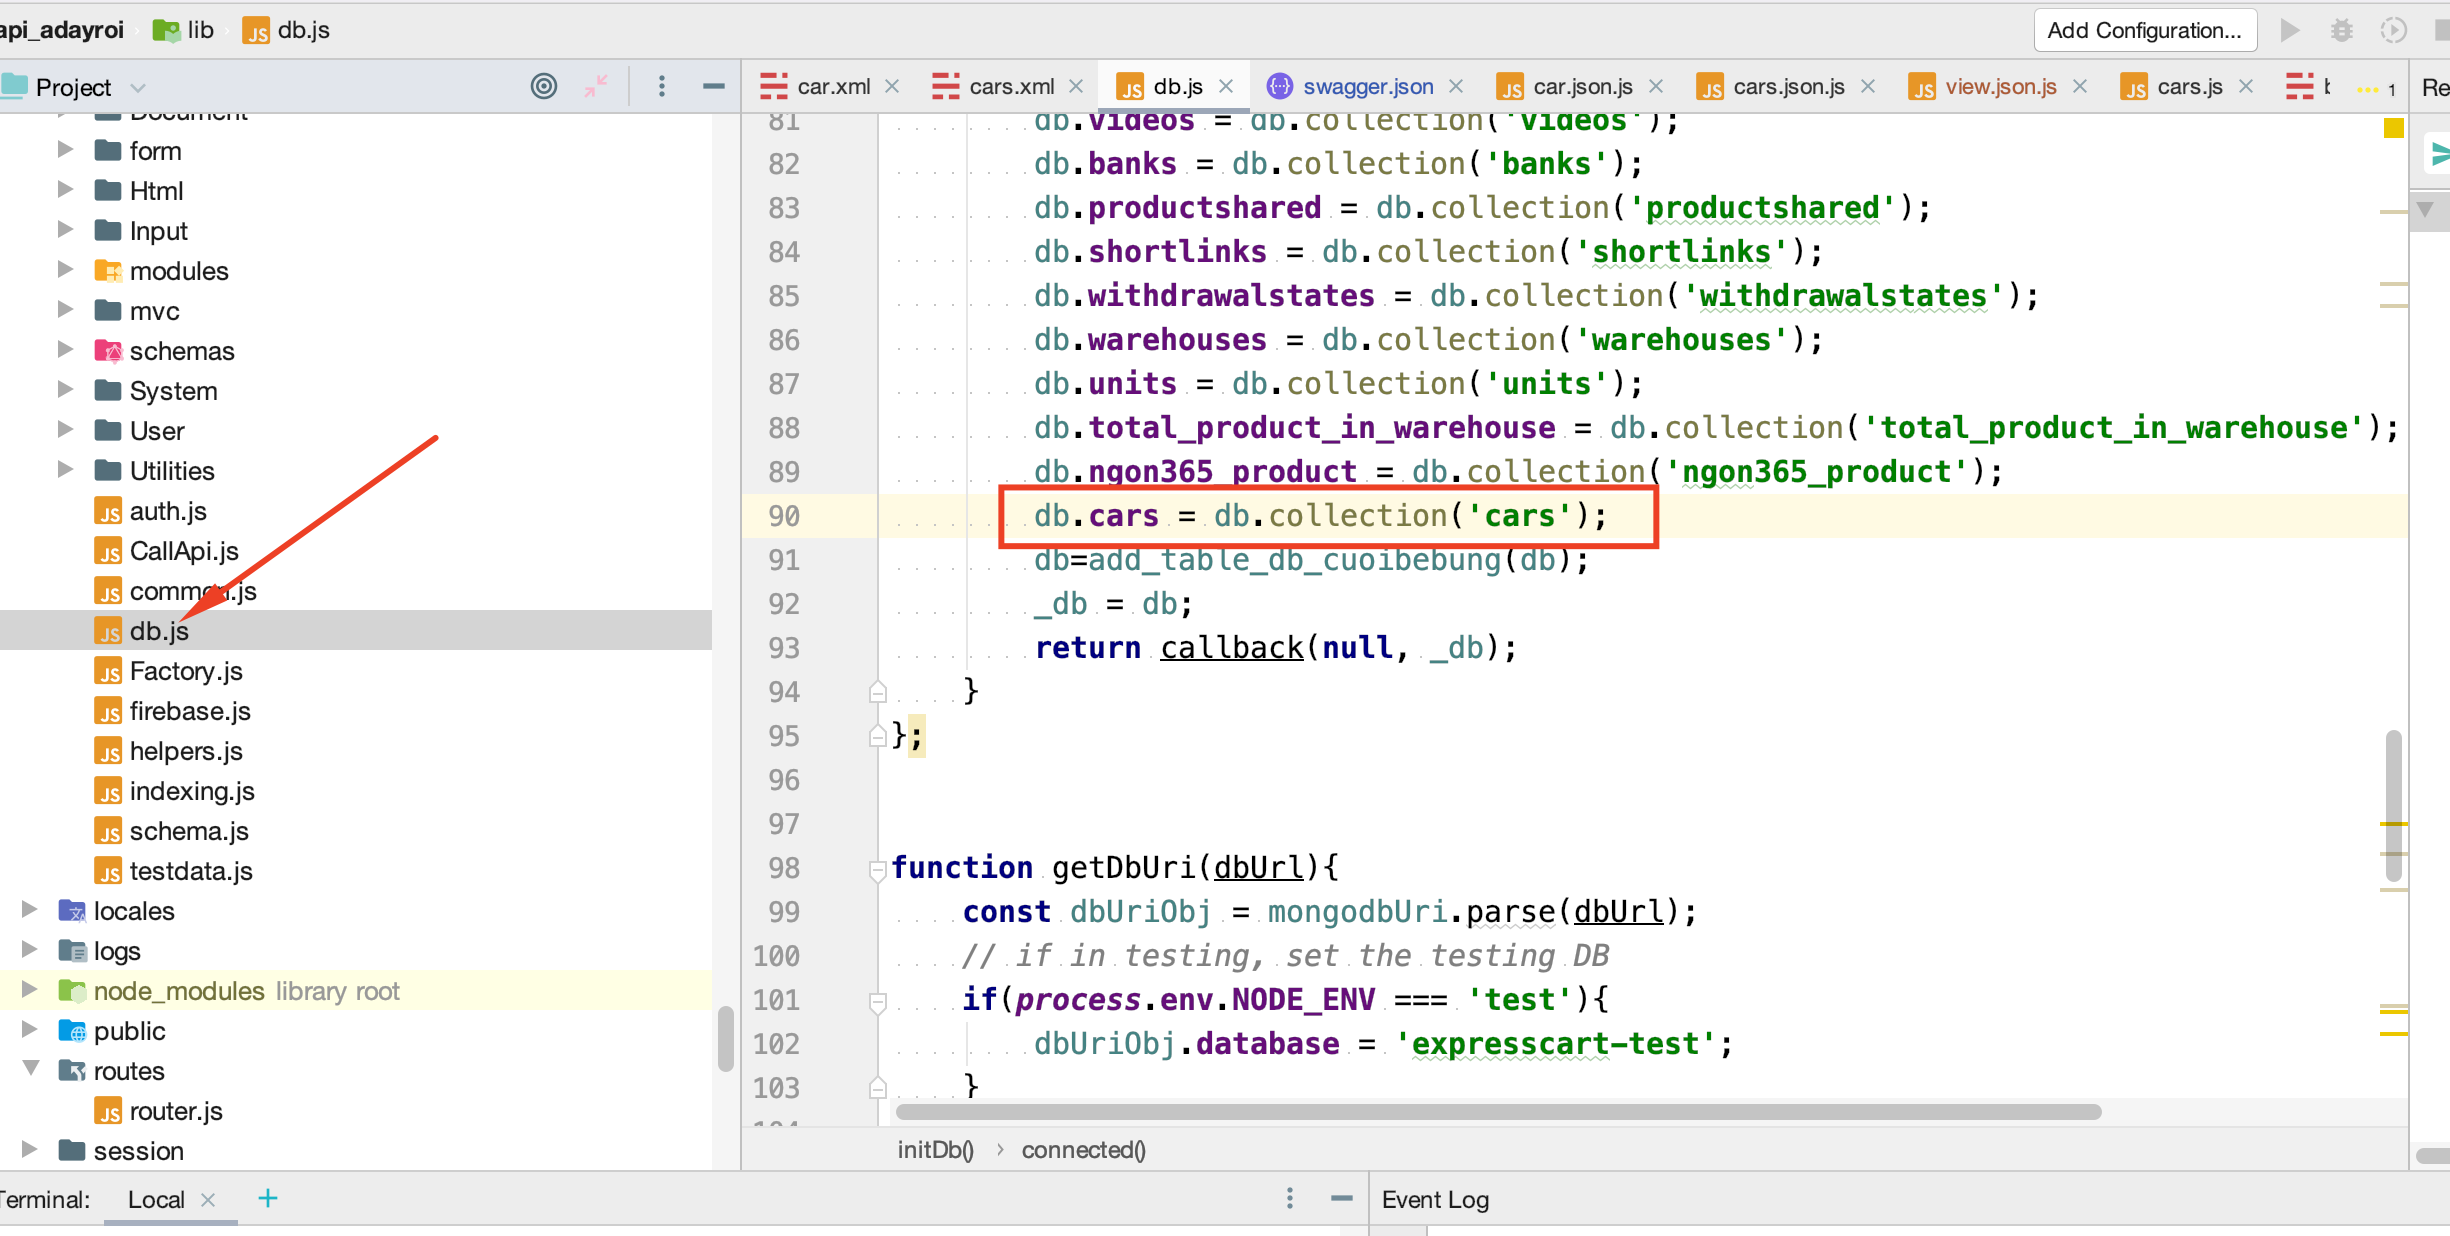
Mở file lib/db.js
Bổ xung dòng sau
db.cars = db.collection('cars');
Vào như hình dưới đây
Xây dựng controller cho car.json.js
Tên file: car.json.js
Nơi lưu file: apps/ecommerce/controllers
Nội dung file:
var controllerfrontenditem = require(`${path_root}/lib/mvc/controllers/controllerfrontenditem`);
const factory = require(`${path_root}/lib/Factory.js`);
const common = require(`${path_root}/lib/common`);
const config = common.getConfig();
const userHelper = require('../helpers/user');
const bcrypt = require('bcryptjs');
var model = require(`${path_root}/lib/mvc/models/model`);
const utility = require(`${path_root}/lib/Utilities/Utility.js`);
const redisClient = require('redis').createClient;
const redis = redisClient(6379, 'localhost');
class car_json extends controllerfrontenditem {
    async update_car(){
        const input=factory.getInput(this.req);
        let data=input.getData();
        const car_id=input.getString('car_id',"");
        const modelCar = model.getInstance("car",0,this.req, this.res, this.next);
        let car=await modelCar.getItem(this.req, this.res, this.next,car_id);
        let car_data={
            _id:car_id,
            car_name:input.getString('car_name',""),
            car_color:input.getString('car_color',""),
            car_model:input.getString('car_model',""),
            car_description:input.getString('car_description',"")

        };
        car=await modelCar.save(car_data);
        return {
            result:"success",
            code:200,
            errorMessage:"",
            data:car
        }

    }
    async insert_car(){
        const input=factory.getInput(this.req);
        let data=input.getData();
        const modelCar = model.getInstance("car",0,this.req, this.res, this.next);
        let car_data={
            car_name:input.getString('car_name',""),
            car_color:input.getString('car_color',""),
            car_model:input.getString('car_model',""),
            car_description:input.getString('car_description',""),
            added_date:new Date()

        };
        let car=await modelCar.save(car_data);
        return {
            result:"success",
            code:200,
            errorMessage:"",
            data:car
        }

    }
    async delete_car(){
        const input=factory.getInput(this.req);
        let car_id=input.getString('car_id',"");
        const modelCar = model.getInstance("car",0,this.req, this.res, this.next);
        await modelCar.delete(this.req, this.res, this.next,car_id);
        let response={
            result:"success",
            code:200,
            msg:"delete car success"
        };
        return response;
    }


}
module.exports = car_json;
Xây dựng controller cho cars.json.js
Tên file: cars.json.js
Nơi lưu file: apps/ecommerce/controllers
Nội dung file:
var controllerfrontendlist = require(`${path_root}/lib/mvc/controllers/controllerfrontendlist`);
const factory = require(`${path_root}/lib/Factory.js`);
const common = require(`${path_root}/lib/common`);
const config = common.getConfig();
const userHelper = require('../helpers/user');
const bcrypt = require('bcryptjs');
var model = require(`${path_root}/lib/mvc/models/model`);
class cars_json extends controllerfrontendlist {


}
module.exports = cars_json;
Tạo view view.json.js cho carcategories
Tại thư mục apps/ecommerce/views/carcategories
Tạo file view view.json.js
Nội dung file
const htmltoobar = require(`${path_root}/lib/Html/HtmlToobar.js`);
const factory = require(`${path_root}/lib/Factory.js`);
const fs = require('fs');
const viewfrontend=require(`${path_root}/lib/mvc/views/view`);
class carcategories_json extends viewfrontend{
    static async display(view, type, req, res, next) {
        const root_path = req.handlebars.helpers.get_root_path();
        const model = require(`${path_root}/lib/mvc/models/model`);
        const input=factory.getInput(req);
        let doc=factory.getDocument();
        switch (type) {
            case "list":
                const modelCarCategories = model.getInstance("carcategories",0,req, res, next);
                const list = await modelCarCategories.getList(req, res, next);

                return {
                    result:"success",
                    code:200,
                    errorMessage:"",
                    data:list
                };
            case "item":
                var id=input.getString('id',"");
                var modelCarCategory = model.getInstance("carcategory",1,req, res, next);
                var item=await modelCarCategory.getItem(req, res, next,id);
                return item;
        }
    };
}
module.exports = carcategories_json;
Xây dựng view carcategories
Tên file: view.json.js
Nơi lưu file: apps/ecommerce/views/car nhớ tạo thư mục car nhé)
Nội dung file:
const factory = require(`${path_root}/lib/Factory.js`);
const viewfrontend=require(`${path_root}/lib/mvc/views/view`);
class car_json extends viewfrontend{
    static async display(view, type, req, res, next) {
        const model = require(`${path_root}/lib/mvc/models/model`);
        const input=factory.getInput(req);
        const id=input.getString('id',"");
        const modelOrder = model.getInstance("car",0,req, res, next);
        const item=await modelOrder.getItem(req, res, next,id);
        return {
            result:"success",
            code:200,
            data:item
        } ;
    };
}
module.exports = car_json;
Xây dựng view cars
Tên file: view.json.js
Nơi lưu file: apps/ecommerce/views/cars (nhớ tạo thư mục cars)
Nội dung file:
const factory = require(`${path_root}/lib/Factory.js`);
const viewfrontend=require(`${path_root}/lib/mvc/views/view`);
class cars_json extends viewfrontend{
    static async display(view, type, req, res, next) {
        const model = require(`${path_root}/lib/mvc/models/model`);
        const input=factory.getInput(req);
        let id="";
        const modelCars = model.getInstance("cars",0,req, res, next);
        switch (type) {
            case "list":
                const listCar = await modelCars.getList(req, res, next);
                return {
                    result:"success",
                    code:200,
                    errorMessage:"",
                    data:listCar
                };
            case "item":
                id=input.getString('id',"");
                var modelCar = model.getInstance("car",0,req, res, next);
                const item=await modelCar.getItem(req, res, next,id);
                return {
                    result:"success",
                    code:200,
                    errorMessage:"",
                    data:item
                };


        }
    };
}
module.exports =cars_json;
Kiểm tra version của app và kiểm tra version của app server node
Mở file
apps/vendor/views/android/view.json.js
Xem hình dưới đây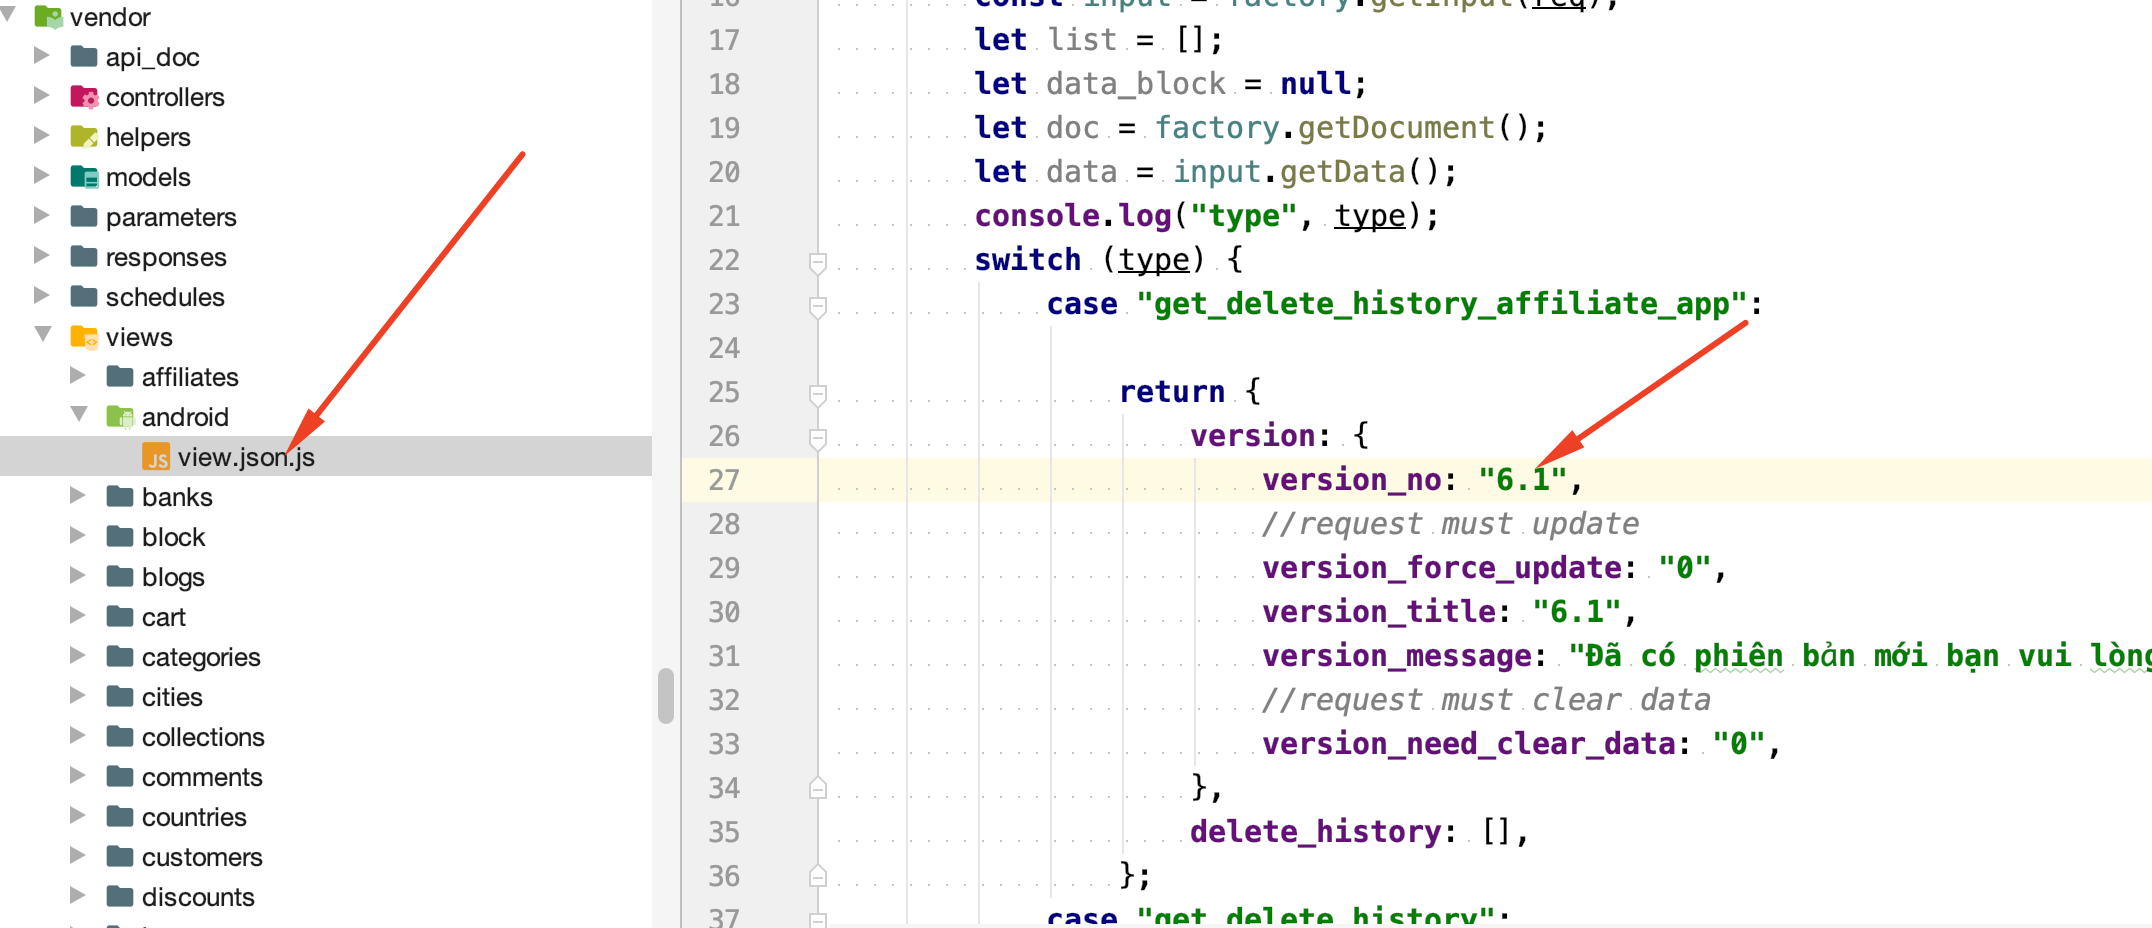
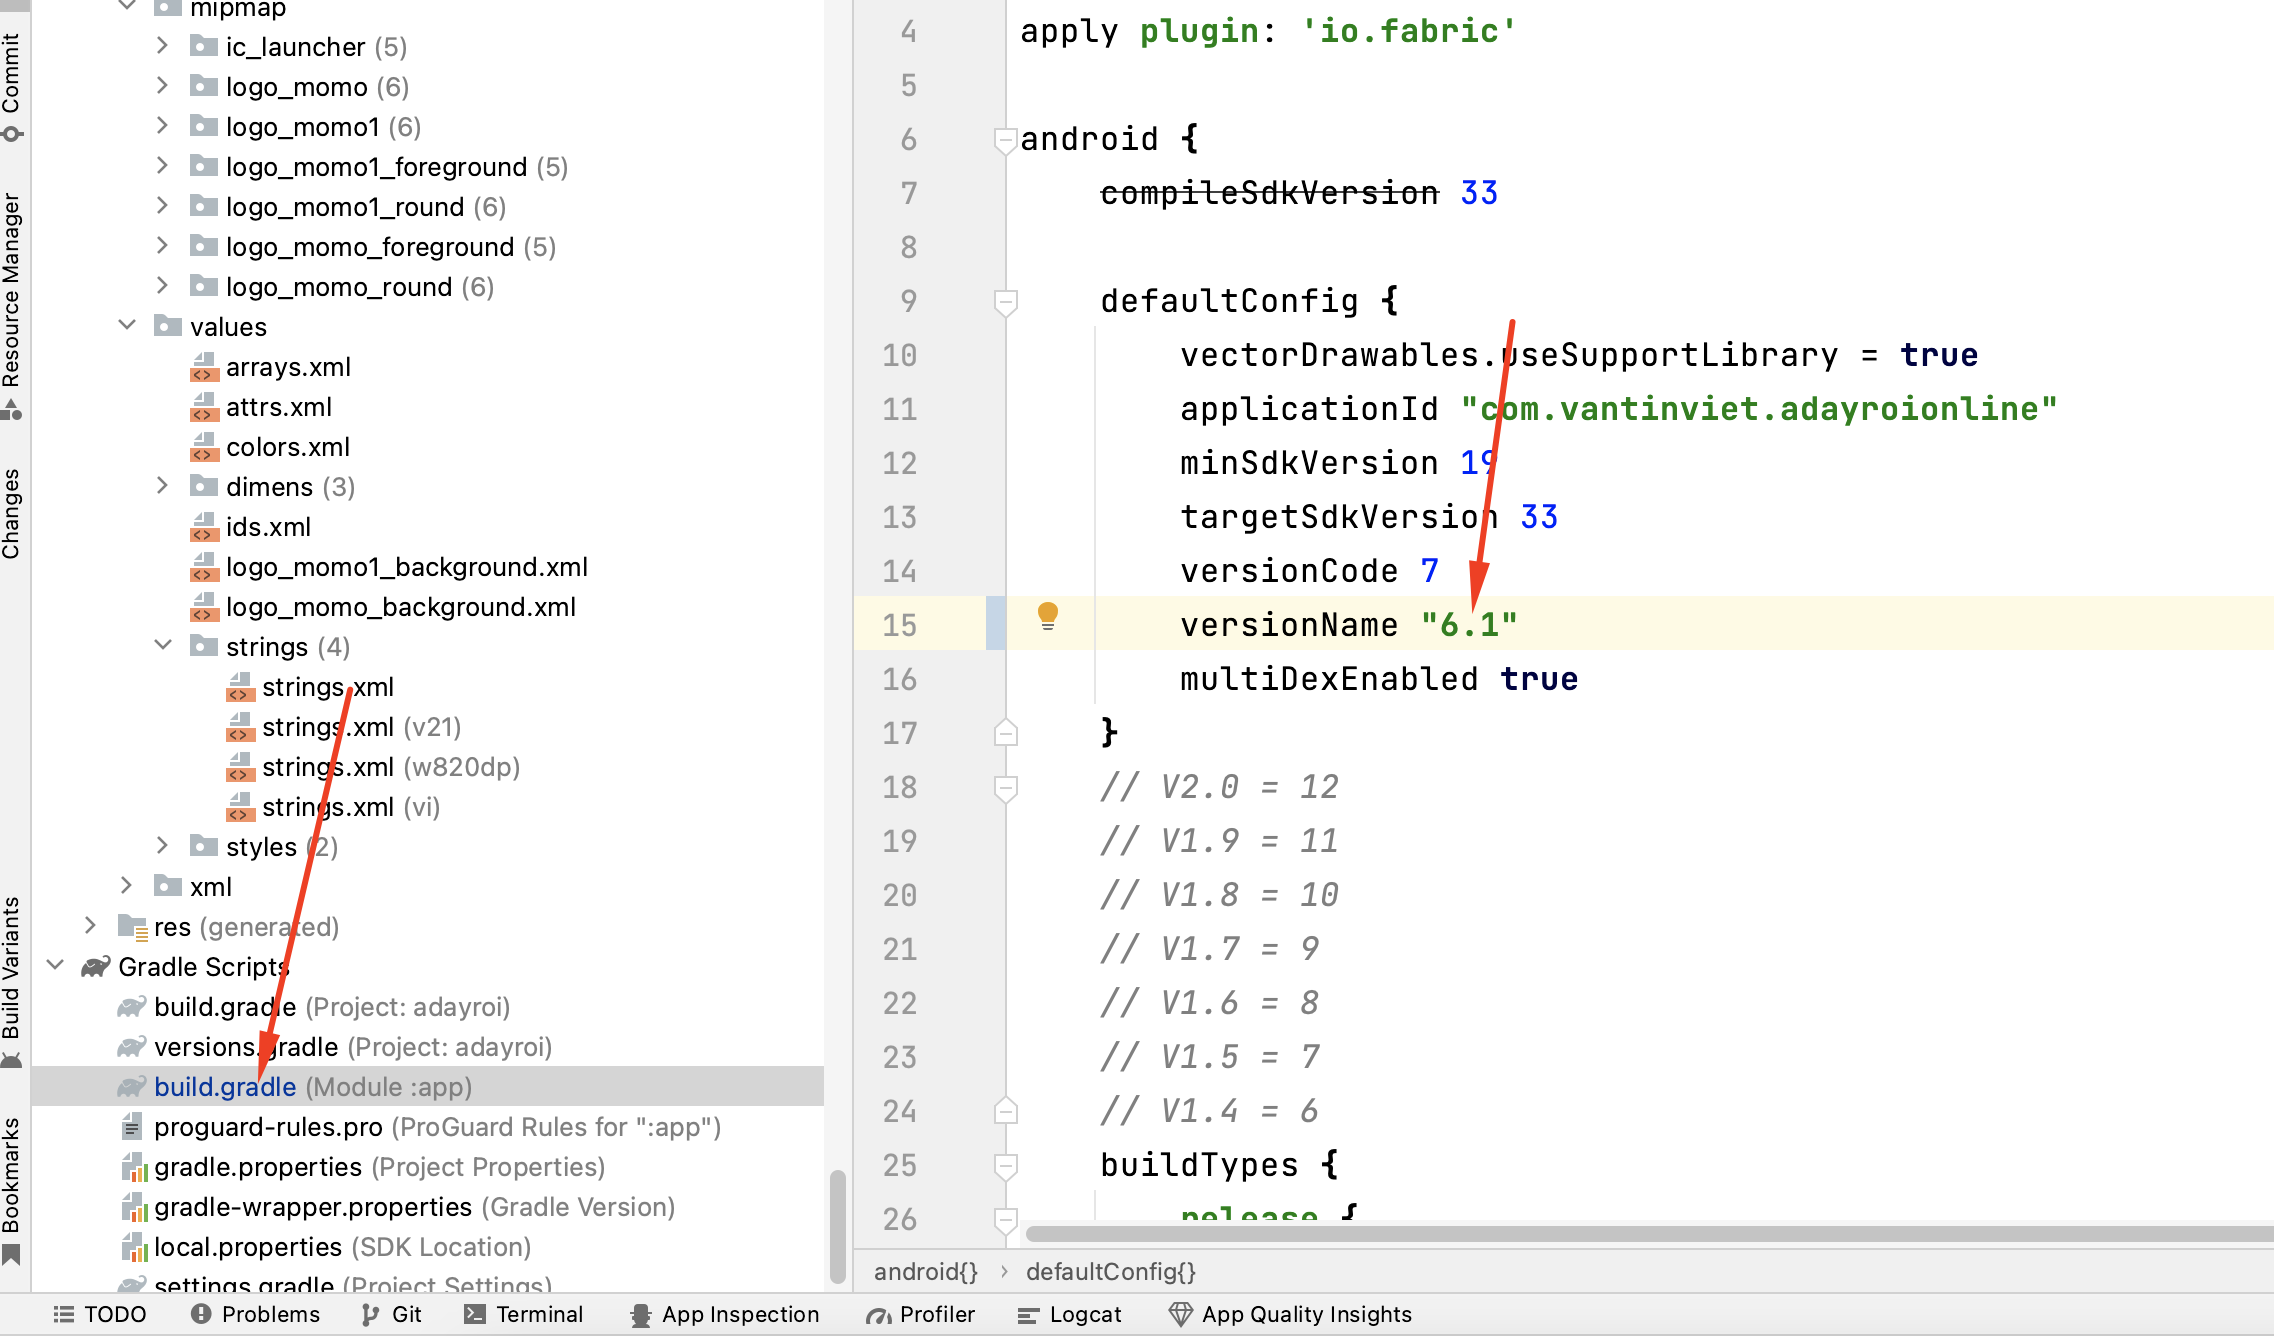
Hiện tại trên app server node đang là 6.1
bạn cần kiểm tra xem app của mình đang ở phiên bản nào
bằng cách mở file app/build.gradle trên app android nhé
Kiểm tra xem đang ở version bao nhiêu điều chỉnh có 2 cái về giống nhau nhé
Hoàn thành
Sau khi đã bổ xung xong thì chúng ta đã làm xong phần api của thêm sửa xóa rồi.
giờ các bạn mở http://192.168.171.145:1114/doc lên và tìm phần cars rồi chạy thử api xem được chưa nhé
Ghi chú
Cảm ơn bạn đã đọc
Tài liệu được cập nhật thường xuyên. Mọi góp ý xin gửi về đội ngũ Softway.